How To Unlock Or Reset Memory Card Password

1 comment
Many of us use password to protect our personal data in memory cards.But it will be difficult to reset if we forget the passwordas the SD card will be locked.So just follow simple steps to unlock(reset) your memory card password

For unlocking the password you should need a Android or Symbian phone and X-Plore application in it


How to Reset Memory Card Password: </ span>
  • First download X-Plore and install in your Symbian(Click Here) or Android(Click Here) mobile phone. 
  • Open your X-Plore apps and press 0(Zero) and check which you have marked the "Show the system files" 
  • Then go to the following path C:/Sys/Data/ Mmcstore 
  • Once you reached at C:/Sys/Data/Mmcstore you need to press "3" under option to set it in the Hex-viewer 
  • In the third column you will able to see a line of code TMSD02G (c??"?x???6?2?6?2?6) . 
  • Just check the character between the "?" it is your password i.e.: in TMSD02G (c??"?x??? 6?2?6?2?6) password is 62626 </ span>
  • So your password is 62626, Now reset memory card password by entering this password.

How To View Saved Password in Google Chrome

Leave a Comment

This trick is simple yet very powerfull to view or hack saved password in google chrome. It does not matter for which website the password is saved it will work on all of them. It will work on Facebook, Gmail, Yahoo, twitter and many more. If you get your hands on your friend computer you can hack their password with this simple little trick. It does not require any software or addons to be installed on your computer.

How to view saved password in google chrome ?  
  • Open Google Chrome 
  • Go to Settings (Its on the Right Corner) 
  • Then Click on Advance Settings 
  • Scroll Down and their will be password and forms from their click on Manage saved password. 
  • Then list of all websites whose passwords are saved on browser will be listed. 
  • Click on show to view those passwords

How To Root Nokia X,X+,XL And Install Google Play Store

1 comment
How To Root Nokia X,X+,XL And Install Google Play Store:

Lets start with the introduction first. Nokia X,X + and XL are the Android phones which was released by Nokia, and it uses their Microsoft services not Google services (Google Play Store). In Google play store we can get lot of games, applications and etc compared to Microsoft services. So don&# 8217;t worry you can install Google play store in your Nokia X,X+ and XL mobiles. Let’s start the full tutorial. 

Things should follow before rooting your Nokia x : 

  • Charge your Nokia mobile minimum 70% why because it doesn’t run out of charge while rooting. 
  • Backup all your important data’s like contacts etc. 
  • Enable USB debugging by simply Settings -> Applications -> Development. 

Software requirement to root your Nokia X : 
  • Framaroot V1.9.1 
  • Nokia X_Gapps 
  • Root Explorer 

Steps you should follow to root your Nokia X,X+ and XL :

Step 1: Download the Framaroot version 1.9.1 from your Microsoft services store and install it to your Nokia X mobile software is completely free. 

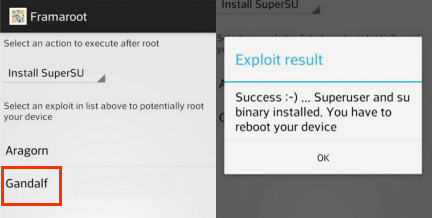
Step 2: Now open that software from your mobile and you can see few options on your screen. Choose install SuperSu and tap Gandalf. 


Step 3: Now you will get a message like &# 8220;Success :-) … Superuser and su binary installed. You have to reboot your device.” like as show in the above image. Just press OK and reboot your mobile and you have root access to your Nokia X. 

Install Google Play Services on your Nokia X :

Step 1: As I said you earlier download the Root Explorer to your Nokia X and install it. 

 Step 2: Grant access to your Root Explorer application from SuperSu. 

Step 3: Download Nokia X_Gapp and copy all the application to the system and change the permission for all files like below image. 

Step 4: Install all the NokiaX_Gapp apk in normal mode and reboot your system then you can see Google Play Store icon. 


Step 5: Open the Google Play Store and it will ask for Google account, enter your Google e- mail id and password and get started. 

Enjoy your Google Play store on your Nokia X,X+ and XL mobiles and download more application from it. If you have any doubt about to root feel free to comment. 

NOTE: once you root your Nokia X,X+ and XL mobile and your warranty can be cancelled.

Easily turn your PC / Laptop into a WiFi Hotspot without any Software

Leave a Comment
How to turn a PC or Laptop into a WiFi HotSpot :
  • Step 1: Open the Command prompt with Administrator rights. 
  • Step 2: Type in the following command 
" netsh wlan set hostednetwork mode=allow ssid=HotSpot key=12345678 "

Here "HotSpot " will be the name of the WiFi HotSpot you are going to create. You can change it to any other name of your choice. Similarly the Key value i.e. “ 12345678 ” is the password to connect to the WiFi HotSpot, you can also change this to any value of your choice. 
  • Step 3: Next type 
" netsh wlan start hostednetwork "

The result should look like this. 

  • Step 4: Next you will have move to Network and sharing center in Control panel and right click on your main network and select properties. i.e the network that you are using to access the internet.

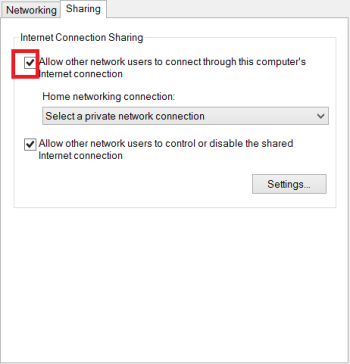
  • Step 5: Finally click on the sharing tab and check  "allow other network users to connect through this computer’s internet connect " 


Thats it now you can search for the WiFi HotSpot from any WiFi enabled device and connect to it with the password key set by you.

Remotely Access Your Desktop PC On A Android Device Over The Internet

Leave a Comment
Remote desktop clients have been there for a while for all operating systems and lately they have made their way onto the android platform as well. To be precise most of these remote desktop clients offer the same basic features. Which is basically enabling you to access your desktop remotely from another device over the internet. 


How To Remotely Access your Desktop Computer on a Android Phone Remotely Access your Desktop PC on a Android Device over the Internet

For the past couple of years i have been making extensive use of a popular and free remote desktop client called Teamviewer. I am sure many of you might have used teamviewer earlier for your various needs. As of now Teamviewer has also released an android app that makes it very much easier for everyone to remotely access their desktop computer from over the internet, using an android phone or tablet.

For those who are thinking of reasons why you need to use teamviewer, then here are a few reasons: 

  • You can remotely provide assistance to your friends and family from your Android device. 
  • You can remotely control your Windows, Mac, Linux desktop from your android device 
  • You can remotely access and download files from your desktop at your office / Home

The list doesn’t end here, depending on your requirement there can be many more ways you can make use of remote desktop clients such as Teamviewer.

Lets find out how you can use Teamviewer to remotely access your desktop computer from a Android phone or tablet. 


Remotely access your Desktop from a Android Phone using Teamviewer

  • Step 1: Download the Portable Teamviewer Desktop Client on your PC and extract the contents to your desktop. Run it by double clicking the teamviewer.exe file. Once the Teamviewer client is open, note down the ID and password provided.
  • Step 3: Open the Teamviewer app on your android device and enter the ID provided by the Teamviewer desktop client and tap on the Remote control button.
  • Step 4: Next the Teamviewer app will prompt you to enter the password. Type in the password which you had noted down before and press OK.

  • Step 5: Carefully remember the mouse interactions which will be show on your android device’s screen. Tap on Continue to proceed further.

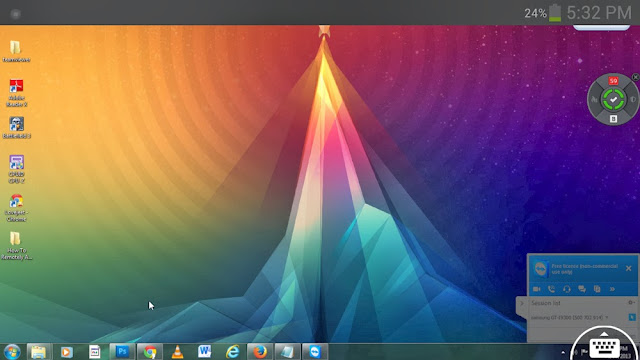
  • Step 6: Now you should be able to view your desktop’s screen on your android device. Drag your fingers on your android device’ screen to control the mouse cursor and and double tap on any file or folder to open it.


Thats it, now you will be able to control your computer like, as if you are just sitting in front of your desktop.

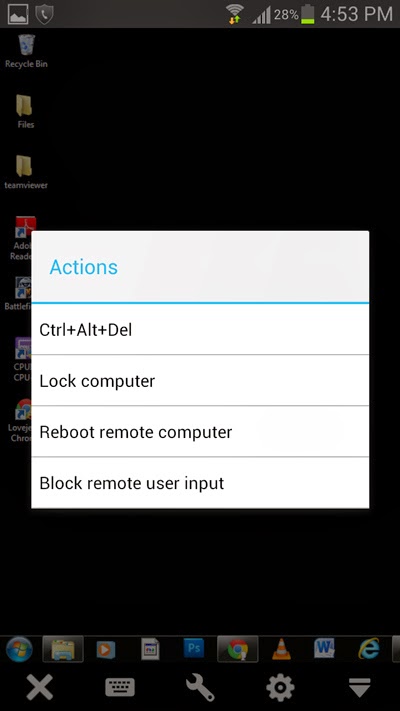
Although you cannot use keyboard controls while accessing your desktop via teamviewer on your android device, but the teamviewer app provides allows you to use the Ctrl + Alt + Del combination. Simply tap on the wrench icon and select Ctrl + Alt +Del. Further you can even lock and reboot you computer with other options provided.


You can even optimise teamviewer for better performance on your android device. Tap on the Cog icon to open the settings. In case the video feed is lagging on your android phone, Change the Display quality to Optimize speed. If you don’t prefer the black background, you can deselect Remove wallpaper option to disable it. 


If you want to type something, then tap on the keyboard icon to to bring up the virtual keyboard and type.


how to unlock android phone's password or pattern

1 comment
Android is one of the most popular mobile operating system. Because it is easy to use operating system. And It provides privacy to user by protecting their data by means of password or using patterns. Many android phone users take this advantage to protect their data using password or patterns. But what happens when they forget password or pattern.?


If you are one of them who forget your password? Here with this trick you will know how to unlock android phone's password or pattern. Follow simple steps to unlock your android phone' password or pattern.
  • First of all Power Off your device. 
  • After this just press up volume key and hold it. 
  • Now press the power button and hold it. 
  • It will start a secret terminal. 
  • Then use home button for go up and down. 
  • Then choose option DELETE ALL USER DATA. 
  • It will take some time, and your android phone is unlocked.
That's all, you successfully unlocked your android phone password and pattern.
 

Note : By using trick you will loose your phone's user data and all system files are reset to default, use this trick AT YOUR OWN RISK

Trick to Use Two Numbers in WhatsApp on Android Phones Without Rooting

Leave a Comment
Hello WhatsApp users, happy news is that you can now use two numbers in WhatsApp simultaneously without the need of rooting your android device. This trick can be performed easily by installing the modded version of WhatsApp on your Android phone. Simply follow the below steps to use two WhatsApp numbers on a single Android phone. 


Use two Numbers in WhatsApp (Without Rooting) On Android Phones

  • Download the Modded version of WhatsApp from here : Download OGWhatsApp(Click Here).
  • Install it and take a backup of all your messages. It's very easy , just open the OGWhatsApp and click on "Backup Data". 


  • Once it is done , Clear the WhatsApp details or it is better to re-install it. 
  • Now move to the folder sdcard/WhatsApp using file manager and rename the folder as sdcard/OGWhatsApp. 
  • In the OGWhatsApp version verify the old number and in the official WhatsApp version verify your new phone number. 
  • That's it , you can use two numbers now in your WhatsApp without any conflicts.
Also Read : How To Download Whatsapp Plus For Android Free
If you face problems while installing the app then make sure that you have allowed the device to accept certificates from unknown sources. For further FAQ's leave a comment below.

How To Root Any Android Device/Infinix Zero In Less Than 5MIN Using RootGenius

2 comments
Being a cheerleader of your device gives you endless super  ability to tweak, twist, and transform your device the way you want it so long you have super user  priviledge. I’ll quickly present you with an alltime how to root any Android device using this simple app.


The latest Infinix Zero is one of the latest device that is currently trending and frenzy, if you haven’t order for your own, do that here.

Requirement
==>PC
==>Disable your antivirus

How Can I Root Any Android Device Including Infinix Zero?
Root Genius is One click root tool designed to work on Windows Computer. It helps user to root their Android Smartphone in single  click. Here, we are going to guide you through on  how to use Root Genius to root any Android Device starting from the latest infinix zero.

==>Enable USB Debuggin on your Android Smartphone. To enable USB debugging, open Settings>> Developers option>>> USB Debugging >> Tick to Enable

And for Android 4.2.2 or above, to show this option Go to Settings>> About Phone >> Built Number (Tap on it for 5-8 times).


==>Download Root Genius Application on your PC here, launch it
==>Once it’s launched, connect your Android device to the computer (with USB Debugging enabled).
==>Once your Infinix zero or any other Android phone is connected successfully to the computer, Root Genius will automatically detect your Android Device.


==>Now, click on the “Root Now” button to begin the rooting process


==>Root Genius will automatically “Root” your Android Device and install the KingUser Application

==>Your Android Device is rooted. To check if your Android is rooted correctly, open Application Menu, there you will be able to see a new app installed, called KingUser. If this app exist, it means your device has been successfully rooted.

Alternatively, you can go to Google play store and download RootChecker app to verify your root priviledge.

Please Note:
1.       This app works for any Android Phone/Tablets including the latest Infinix Zero plus any Android device you’ve not been successful in rooting.
2.       No Data Loss: With this rooting method, you won’t loss any data like contacts, pictures, videos, music etc.
3.       Warranty Void: Your device warranty maybe void after following the above tutorial
4.       How To Unroot: To unroot your Device, Open KingUser on your Device >>>Settings >>> Remove Root Permission and you are good to go.
5.       This app was created by SJRoot Developer (All credit goes to them)

Please kindly let me know if you’ve tried the above tool to root your Android device, if it works for you, which Android device and model of the device. If it didn’t work for you, drop your device name and a solution will be provided using the comment box

How To Increase Your Android Ram Memory

Leave a Comment
Once of the worst thing that can ever happen to Android users is for their device to be crawling like snail or freezes whenever you open one or more application. This kind of problem normally happen when your Android device is running  low  on RAM, therefore you can’t open all the necessary games and apps because of this.

Though Link2sd that I talked about the other day will only help you free application space instead of running those app directly on your phone memory; while the RAM expander gives you an additional
RAM space on your SD card.

I know you will be wondering how can an app increase the RAM memory of your android device but The app can increase the RAM of Smartphone with a new technology in which a new file is created called as SWAP file on the SD card and this file is used as Virtual RAM to boost the performance of Android Smartphone. The App that can do this unthinkable task is ROEHSOFT RAMEXPANDER.


Let me quickly introduce you to ROEHSOFT RAM Expander. ROEHSOFT RAM Expander will bail you out of insufficient RAM memory. This app uses part of your memory card as ram if your SD card is large.

Why Should I Use ROEHSOFT RAMEXPANDER?

-It will do the following on your Android device;
-Free SD card memory as a RAM use (SWAP RAM / SWAP MEMORY)
- Swapfile RAM expansion up to 4.0 GB (file system limit)
- No limit on SWAP partition!
- The usual performance degradation when paged not occur with sd card from class-8
- Widget for PNP swap (swap on / off swap)
- Detailed Memory Information & Analysis
- Autorun
- Swappiness kernel parameter set
- Easy foolproof use  (1 click optimization and automatic calculation)
- Supporting Tung all Android devices (root access and Kernelswap support)

Before Your Download This App, Check Compatibility With Your Device
 But before using the ROEHSOFT RAMEXPANDER app, it is very important to  first check whether your device is compatible with the ROEHSOFT RAMEXPANDER app or not.  

To check compatibility, download from Google play  MemoryInfo & Swapfile Check plugin which is free to download and use. The main purpose of the software is to check whether your device is compatible with RAMEXPANDER or not.; because some some Android devices are not in support  in spite of root privileges.
 
How Can I Download This App?
Visit Google play to download it or click here to download

Fix This & Change Any Android IMEI

Leave a Comment
I still believe there are still some people who are still finding it difficult to change their IMEI on Android in order to use Glo BIS and I thought if I can share what my good friend Onyx shared with me on BBM again here. I know of some phone which are MediaTek but still remain adamant in IMEI changing most especially those one running Kitkat Os like the latest Infinix zero or Innjoo mobile which is not supposed to be so. Though I have posted this thing before here but didn’t make emphasis on what I’m about to show you. Maybe your device may have been repaired and now you are getting problems related to network error this method will help you fix it. Make sure your Android phone is rooted How Can I Change My IMEI?
Normally, when you dial *#7465625# or *#*#3646633#*#* >>>You should be able to navigate to CDS Information >>>Radio Information and then AT+EGMR=1,7,"IMEI_NUM_HERE" (The normal AT command above doesn't work) It gives an error report like this: "this AT command is not valid for UserBuild" instead of the success report of: "AT COMMAND sent" simply because there is no space between T and + (there must be a space between the two command). Now look at the correct command below; AT +EGMR=1,7,”IMEI_num_here” (I believe you can see the space now?). When you get to that command page, you can manually include the space and freely change your IMEI. All HTC Phones user should use this method here to change their IMEI. The method above works with all Android device. Don’t forget to generate BB IMEI here or request for BB IMEI using the comment below and it will be send to your inbox.

MTN Cheapest Data Plans Ever - Tested & Trusted

Leave a Comment
Airtel has finally stopped 4gb Bis plans. I don’t know why they are fluctuating like zmap and I really hope they’ll rethink and bring back this plan before we sanitize their database; cos it has really helped a lot of people here. I just can’t imagine what iPhone/iPad users will feel right now because it’s no longer funny as data climbing up like angry PHCN dude. Android users have no reason to complain about data since Glo Bis is still smiling at you.
The other day, I made a post on the Cheapest Data Ever talking about Mobilblaze but I think there is another better offer here that serves better than Mobile blaze. I’m personally recommending this one to all who want to buy data on your MTN line. Here are the plans below: 250mb = #350 (400 MTN card or VTU) 500mb = #600 (700 MTN card or VTU) 1gb = #1100 (1200 MTN card or VTU) 2gb = #2000 (2100 MTN card or VTU ) This plans Works on all Android phones and tabs, iPhones and iPad, BlackBerry OS10, Nokia xl series, Symbian, Java phones, Laptops and PC. You can contact the seller via this number 08161145975 or add him up on bbm 79D8301F What About The Valdity? The validity is 30 days. I personally recommend this to anyone who wants to buy data. It will take less than 7min before your account will be credited with data. Remember, my job is to make internet surfing cheaper for all. Are you confuse? Ask me your questions...

Etisalat Still Rocking With YourFreedom

Leave a Comment
I don’t want to talk about this but for the benefit of those who are making demand for it, Etisalat still works with YourFreedom VPN with the same old settings. ==>Download YF android app here ==>Register for YF app if you haven’t done that already ==>Download Android DNS changer here ==>Launch the DNS CHANGER android app, on the; Primary DNS enter 8.8.8.8 Alternate DNS enter 8.8.4.4 Click on SET ==>Your Android Device must be ROOTED before you can use DNS Changer. ==>Minimize the DNS Changer app or better still after you click on SET, leave the DNS Changer that way then launch the your-freedom android app. ==>On the Your-Freedom android interface look at the downside for Configure and click on it. Click on Account Information; enter you-freedom account details (username and Password) ==>Click on SERVER CONNECTION; On Your-freedom server option enter any of ems03.your-freedom.de or ems09.your-freedom.de, ems08.your-freedom.de, ems12.your-freedom.de or better still use the WIZARD option to find a suitable server best for your location. Connection Mode: DNS Port: 53 Tweaks: Nigeria Etisalat Leave every other thing the way they are. ==>Click on Proxy Settings. On the Proxy Address enter; 127.0.0.1 Proxy port:8080 ==>Go back to the main interface and from there Click on START CONNECTION. wait a little bit for the Your-freedom to get connected. On a successful connection your-freedom android app will look exactly like the image below.
The only limitation is that YF gives you 2hrs free usage per day… If you want to enjoy it to the full, make an upgrade

Update: Nanu Application Now Available For Download

Leave a Comment
Well if you are so tired of using your money to make calls, then you might want to consider this app again and again because it works in all countries except infected and demented locations. I had written about this crazy unique, fabulous application called Nanu
OMG don’t let me use the word tantalizing because it’s not shawama; and almost everyone has been waiting earnestly for the latest release.

However, I’m glad to inform you that the app has fully been launched and it’s readily available in Android market for download or you can get it here

You can read more about the app  fully here.
But remember, with this Nanu application installed on your Android phone, you can make free calls anytime or any day. Let the free calls begin.

Update: How To Increase Your Android Ram Memory With Roesoft Ram Expander

Leave a Comment
This particular post is for those who has low ram memory or perhaps you noticed that your phone is so slow and crawling like slowDNS snail; or whenever you attempt to open multiple applications on your device, you always get “sorry application has stopped working,” what normally cause something like this is when
your ram is so low; but there is a solution to this.

RAM Expander helps you to handle this case as it bails you out of insufficient RAM. What this app  does, is that it act as an additional RAM to your device by using part of your memory card (You must have enough space in your memory card to use this) to create a file called Swap File on your SD card and this file is use to create a Virtual Ram on your SD card to boost the performance of your Android Phones.

Where Can I Download This Paid app for Free?

Though the application Roehsoft Ram Expander is a paid app on play store but you can download a crack version here for free.
Read more about this app on my previous thread here

How You Can Start Ordering For Android Tablets For As Low As #6,500

Leave a Comment
Empowerment in the word of the wise simply means enablement… In as much as I like sharing tweaks and cheaper internet surfing, I also love to enhance your financial capability so that you won’t just be available for count in your country, but can be counted upon; so that you won’t just be a human resource file in your office, you won&# 8217;t just be a matric number in your school but a value added personality.


One thing school didn’t teach us is how to make money. Have you ever wondered why A’ student always work for C’ student’s? the answer is simple; A’ student works with Artificial intelligence while C’ student who are productive works with creative intelligence. A’ student believes in being employed after school while C’ students believes in creating employment opportunity for A students.

I’ve shared with you how you can make money in different ways ranging from sales of MTN Data Bundle, affiliate marketing etc. But today, I’ll love to share something vital and important. If you don’t have time to read this, you can as well print it out and read it at your convenience.

I’ll show you how you can buycheap Phones, Android tablets, Laptops at a more cheaper price… I mean buying an Android Tablets for as low as #6,500 and reselling it @ 15k or 20k. It’s so simple to do for every body. 

How Do I Buy Cheap Android Tablets?
==>Go to Alibaba.com
Type in the search bar “Android Tablets” and series of android tablets will come out with their prices


Take a look at the spec preview below;
Operation system:Android 4.1 OS
--Screen:Five point capacitive touch screen
--Storage:8GB
--Memory:512MB RAM
--Dual cameras:front 0.3M,back 2M
--WIFI,3G external
--4000 MAH battery
And it’s been sold for Just #8,000 ($50)

==>Take a look at another one that is even more cheaper than the first

Look at the spec below;
Operation system:Android 4.2.2 OS
--Size:9 inch
--Screen:Five point capacitive touch screen
--CPU: VIA 8880 Dual Core  Cortex A9 1.5GHZ 
--Storage:8GB
--Memory:512MB
--Dual cameras:front 0.3M,back 2M
--WIFI,3G external
--4000 MAH battery
--Port:HDMI,USB port
And it’s been sold for just $41 (#6800)depending on the number you are ordering for. 

How Can You Make Your Order?
You’ll be required to register before you place your order. Once you&# 8217;ve register, go ahead and place your order and choose your secure payment method. They also make free shipment depending on the supplier's company.

You can easily order for large quantity and resell them in your location at a more cheaper price. Just be wise and smart.

Another one that you might want to consider is AliExpress.com that works just like Alibaba. All this tablets, phones, Laptops are what people buy everyday, so the market is readily available.
Remember that money hurries away from those who waste it and hurries to those who invest it

Samsung Users, You Can Now Change Your IMEI Here

Leave a Comment
This post is for all those device that proves so stubborn to tweak and I can really tell how bad it is to be unable to  change your imei most especially for Samsung users for over 3months now because virtually almost all the method seems not to work for Samsung users because their device is not an MTK device; therefore, hindering them from using other network bis plan on their device.


Well, thanks for your patience and I&# 8217;m glad to inform you that you can now change your IMEI with ease and enjoy what other MTK users are enjoying. Mind you, for those spreading the rumour that Glo is blocking imei, it’s not true; blocking this tweak simply means stopping the usage of blackberry plan on bb device.

For non MTK users, your imei can only be changed via a hardware device, unlike the others where you can easily change by downloading an app called engineering mode to your device. On this note, the hardware device was purchased by a loyal fan, friend and brother of this site just in a bit to help every non MTK device to change their own imei. 

Therefore, he will be going from state to state to help you change your IMEI and it’s going to cost you a token of # 1,500
If actually your Android Zapps data as if you are sucking juice, then you shouldn’t give changing your imei a second thought.
To know the Samsung device and other products supported by this hardware, follow the link below and read carefully the pdf file including the days he will be coming to your state.

Don’t forget that you can get 12GB on glo for #4,000 that will last you for 4months only if you have successfully changed your IMEI… Be wise.

If you have any questions, don’t hesitate to drop it below or call the dude.

Is Your Android Giving You Problem? Fix It Here

Leave a Comment
These days, Android phone despite the fact that it’s has gained more market than blackberry, can easily be bricked or developed a major problem. The other day, a colleague of mine in the process of installing a pregnancy test app on her android device got it stocked and paused for over some hours. A hard reset was done and the phone got back to normal. I know there are so many of us whose Android device might be giving you some problem or malfunctioning in one way or the other, please feel free to post the problems here so that a reasonable solution will be proffered accordingly. And to those who demanded for an OS upgrade, rooting guide and best data plan for your device, sorry for not replying you on time because I was so occupied with a major task. Just feel free to post your Android device problems here and a reasonable solution will be proffered accordingly.

Infinix Zero Android 4.4 Kitkat Now Available For Pre-Ordering At Afford

Leave a Comment
And I think this Infinix Zero beat hands down Nokia XL considering the price also and I’m getting to love it (though I’m not device freak). One thing I forgot to mention with regards to the New Mtn Android is for the fact that it can’t allow you to use any other sim on sim one (1) except an MTN sim; and it’s only Sim one (1) that has 3.5G while sim two (2) has only Edge and you can use any network sim on it. In other words, it’s useless without MTN sim on sim one… So if you are not an MTN lover, you won't enjoy the new Mtn
Android phone.


Back to base, Infinix zero that was long announced coming with Android 4.4.2 kitkat is now available for pre –ordering at Konga and the price is a kind of cheap and affordable. Take a sleek preview of the spec again;

Camera: 13 megapixel camera , AF, BSI with 2 megapixel front facing camera
Internal Memory: 8GB with SD card slot that supports up to 32GB memory card.
RAM: 1GB RAM
OS: Android 4.4.2 KitKat
Price: #20,900

Will you Pre – order this Inifinix Zero? To check the full spec and  pre – order from Konga, Click here

How To Unbrick Any Android Phone

Leave a Comment
One of the greatest fears of every Android user is the fear of “bricking my device”. It’s  no longer news, the rates at which Android phones are been bricked is beyond imagination. From the info I’ve gathered so far, the major problem of any android phone is bricking the device. Some of you will bare me witness that some bricked android device are been fixed while some are not been fixed. 


But for those who already bricked their Android phones and don’t know what to do next, I’ll like to summon  you to draw your learning chair closer, let’s see how we can  unbrick it.
I’ll quickly share with you two interesting ways you can unbrick your device, even though you are been told by your device Engr that there is no more hope for the device.


How Can I Un-brick My Bricked Android Phone?
First method
1. Get a phone of the same type that is not bricked
2. Boot the good phone into recovery mode (hold volume up + power button while the phone is off)
3. Go to Backup and restore
4. Select Backup then yes to confirm
5. After Backup is complete, copy the backup file / folder from the SD card of the good phone to the SD card of the bricked phone (maintain the file path)
6. Boot the bricked phone into recovery mode
7. Go to backup and restore
8. Select Restore
9. Select the backup you just copied and click yes to confirm
10. Your Android  phone should come back to life


If  perhaps your Android phone proves stubborn, then try the next method

Second Method
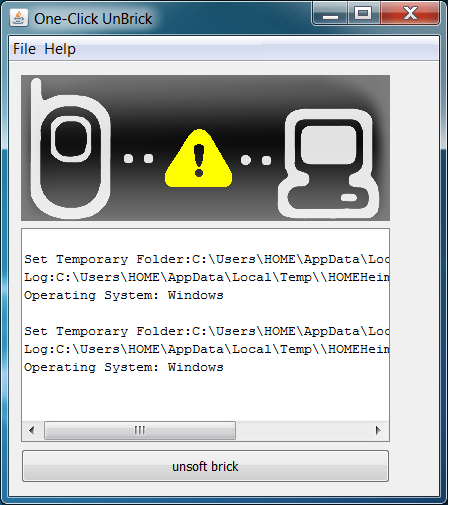
One Click Unbrick Method

What You Need
==>Java installed on your computer or download it here
==>One Click Unbrick tool or download it here

How Can I Unbrick It Using This Method?
==>First of all extract the OneClick.jar file you downloaded (Right click the file and select Extract) 
==>Now you will get a folder named OneClick
==>Copy the file OneClick.jar (the one from which you extracted the folder) and paste it into “OneClick>heimdalloneclick>resources>HeimdallPackage“
==>That's it, now run the file “oneclickloader” which is on same folder
==>Dialog will open and installation will be completed (grant access if it asks)


href="https://blogger.googleusercontent.com/img/b/R29vZ2xl/AVvXsEgZwm7ebgubYciHb1P3LTrYfK3YEJbjjXUh_J4XTxjhcjj5zw0KzpDMxUthJLkKhfh1Zx6CBDllgU6toUqGB0LVxHHqZYm4VPSdmxyoCxMawgTQLKjfT8kfn9oTxsiRAOO0lsaIrM9F_uE/s1600/unbrick-4.png" imageanchor="1" style="margin-left: 1em; margin-right: 1em;">

==>Connect your phone via USB and click on “Unsoft Brick” to unbrick your phone.

That is it, your Android phone should now be back to life. Any Question?

How to Earn Big With iReporters.tv

1 comment
The other day, I shared a vital, expensive information that was men’t to be sold for free on Importation Business because It’s something that has worked for me and I want others too to benefit. I'm sure you all got the ebook I sent. Please, guard the information jealously… those of you that must have visited the link will see that it’s actually pays to order online. Before you order for any products, kindly read the review of each supplier so that you won’t be scammed. 


Today, for the benefit of new bloggers  who desired to earn online or for those who don’t even have blog at all but still want to make money online. I know you all love to watch movies from your smartphones most especially Nigerian Movies. Do you know you can be paid for watching movies online or uploading movies online…?

Well, this may not be new to you but new to others. I’ll share with you simple ways to earn online, and it pays like google adsense.

iReporters ,  Africa's largest internet TV, enables producers of good quality video content upload, distribute, and make money from their videos. Your own Job is to  upload your video or promote existing videos on social media, blog or any means.  iReportersTv hosts it for free and offers you tools to help you effectively promote your videos online and pays you for every single view of the video.

How Can I Start?
==>Go to iReporters site here to sign up
==>create a channel
==>And upload or promote videos here

You will also be provided links to enable you promote your videos on other platforms like your blog or social media accounts or even email. The more eye balls you attract to your video, the more money you make.
There is also an iFollow button that enable viewers who love your content to follow your channel, that way they will get an alert each time you publish a new video, helping you build an audience of regular viewers.

iReportersTv.co tracks the number of views your videos get and pays you for every view. What you earn for each view depends on your cumulative views for the month and starts at $2 for 1,000 views. If you can generate views of between 200,000 and 500,000 views, you will earn $3 for 1,000 views, and $4 for 1,000 views if you can generate over 500,000 views in a month.

How Can I Record My Videos?
You can record videos from with your Android, Blackberry or even Nokia phones or PC teaching people how to cook, tutorial or so. If you love baking, why don't you just record a one time video, upload it and watch it fatten your bank account; because there are so many people who want to learn what you know how to do best.

So start earning without limitation.
Leave a Comment
Get Free 1GB From MTN Now. If you are still a friend of MTN, and you know you are not beefing them and they are still part of your favorite kindly insert ur mtn sim and dail *559*4# note its not a trick

Get Free 700MB Daily From Mtn Now

Leave a Comment
Get Free 700MB Daily From Mtn Now you will appreciate the value of having multiple Mtn Sim cards. No long stories, just dash straight to the point. Follow the below steps to get free 700MB from your MTN sim. ==>Dial *662*6# and subscribe for all the plan you see there i.e from jumia to easy taxy (monthly trial) each monthly trial you subscribe to gives you 100mb and they are 7 in numbers...giving you 700MB in total ==> The 700mb can only work with this site www.jumia.com.ng. Meaning that aside of the above site, it won’t work. ==>So if you already have Simple server, open it or download it here ==>Same thing goes with openvpn or download the ovpnhere and config file here==>Open it and replace anywhere you see 0.facebook.com or blackberry.com with jumia.com For PC users, download SS.exe here
Powered by Blogger.

Wikipedia

Search results

Blogroll

Become a Fan

Blogger templates

Blogger news